A lot of folks, myself included, have lost tons of gear to the Canal’s bottom.
In some areas the bottom of the Canal is a jumbled mess of rocks, marine vegetation and who knows what else. I’ve seen pictures of entire tug boats sinking in the Canal, so one can only imagine the strange things that are down there.
The incredibly strong Canal current also makes fishing the Canal difficult for beginners. Without even realizing it a lure or bait can be swept right into the rocks and buried down deep in a crevice. The result is usually the same – a lost plug, rig and sometimes an entire spool of line.
Some people get discouraged early on by this. If this has happened to you I can certainly empathize with how you are feeling.
However, fishing the Canal does not have to be a nightmare. It’s very possible to efficiently fish the Big Ditch without losing a single plug, lure or bait for weeks on end.
To avoid losing all your tackle at the Canal, be sure to keep the following in mind.
Spool Up with Braid

thBraided line is a true life saver at the Big Ditch. Because braid has next to zero stretch, it is much easier to detect when you have hit bottom.
This is very important when jigging, or fishing any lure or bait down deep.
On the other hand, mono-filament has a great deal of stretch. Because the line stretches so much, it will be difficult to detect bottom. When jigging with mono, it is very possible to not feel bottom and thus leave your jig lying on the bottom for too long.
The current usually takes advantage of your lackadaisical moment and sweeps the jig into a snag.
I like to use 50 pound Power Pro at the Canal. 50 pound Power Pro works very well whether I am jigging or casting top waters. It’s a good all around line that I highly recommend.
Count Down the Seconds to Bottom
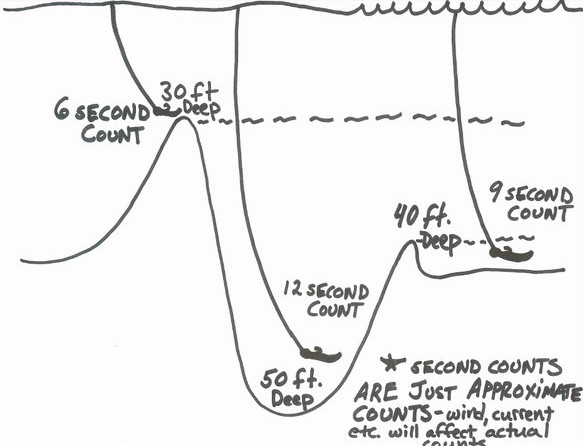
When jigging the Canal, keeping a count on how many seconds it takes a jig to hit bottom is very important.
For example, in many areas it will only take the jig 7 or 8 seconds to reach bottom. However just a few yards to the left or right it will take 15 or more seconds for the jig to reach bottom.

Keeping tabs on the time it takes the jig to reach bottom lets you know the general depth of the area you are fishing.
Watch the below video for an example of how to do this.
By keeping track of the seconds my jig is falling, I can maintain a general idea of how deep I am letting my jig fall. This is important especially on windy days when it can be hard to “feel” or “detect” bottom even when using braided line.
If I am fishing an area that I know requires 10 seconds to hit bottom, then after 10 seconds goes by I will start my retrieve. Allowing the jig to sit on the bottom for longer than 10 seconds may result in a snag.
When the Tide's Running, Don't Try to Hold Bottom
When I worked at a bait shop as a kid, one method that I quickly learned did not work well was trying to fish a chunk bait on the bottom during the middle of the tide. In other words, these folks were attempting the impossible-holding bottom when the Canal’s current is running full steam.
Trying to fish a bait stationery on the bottom when the current is running is a formula for quickly losing everything in your tackle box. Really the only time you can cast a 5 ounce sinker out there with a chunk of bait and not get hung up is during slack tide.
If you want to fish chunk baits when the tide is moving, consider using a rubber core or fish finding sinker rig. Instead of using a lot of weight and trying to hold bottom, try using just an ounce or half ounce and drift the chunk down current.
Once the chunk starts moving in towards shore, reel the chunk in, cast it back out and reset the drift. Drifting chunks as opposed to trying to hold bottom when the tide is running is a good way to fish and not lose a ton of gear.
When Casting With Braid, Lock Your Bail
I have lost a bunch of expensive plugs when my bail suddenly flipped over on me mid-cast. Because braid has zero stretch this always results in the plug snapping off and flying out into the middle of the Canal.
What I didn’t realize at the time was that many of the new spinning reels used at the Canal have a bail locking mechanism. By pushing a button or simply keeping the open bail snug to the reel seat you can eliminate the possibility of the bail flipping over mid-cast. Be sure to read up on your reel specifications to see if your reel has this capability.
If You’re Stuck, Don’t Give Up!
Most of the time when I get stuck I am able to pull the jig or lure free from the snag.
What I normally do is wrap a coil of braid around the reel handle. Once the line is taught I just walk up and down the Canal rip rap, consistently and gently pulling on the snag from different directions.
Many times the jig is just bundled up in a weed bed. These types of snags are relatively easy to pull free from.
Other times the jig is embedded in a mussel bed. These are a bit more challenging but you can often pull the jig free with some effort. Usually you also get a mussel or two back on the hook.
I’ve even had times when I pulled back a jumbled mess of rocks. Briaded line is so strong that it is possible to pull entire rocks free from the Canal’s bottom. I’m not talking boulders here, but it is not uncommon to pull up a giant mess of weed and have a baseball size rock attached.
In Conclusion
All in all it is inevitable that you are going to lose at least some gear to the Canal Gods.
However with time and practice it is very possible to fish the Canal for an entire season without losing all that much gear to the bottom.
Gluck and tight lines! 🎣

